
If you want to know how to make a pinata that works, decide how it will be filled, hung and opened before adding decorative paper.
A first pinata does not need an elaborate character. A clear star, heart, number or simple animal head teaches the important parts: creating two matching faces, connecting them with a side strip, leaving a filling opening, supporting the hanging area and decorating without sealing the function.
This guide uses cardboard and paper because they are accessible and close to the structural thinking used in much handmade production. Other craft methods exist, but the sequence below keeps the project understandable for a beginner.
The exact strength depends on the material, glue, size, contents and how the product will be used. Make a small test before preparing an important event piece, and use suitable supervision and a clear activity area.
Materials for a simple cardboard pinata
- Corrugated cardboard or sturdy paperboard for the main faces
- A long flexible cardboard strip for the side wall
- Tissue or crepe paper in the planned colors
- Craft glue appropriate for paper and board
- Scissors and a craft knife used by an adult on a protected surface
- Ruler, pencil and tape for layout and temporary holding
- Cord or another planned hanging component
- Small sweets, wrapped favors or other suitable contents added later
Choose materials for the intended size. Heavy board can make a small party product difficult to open; very weak board may collapse while being filled or hung. The aim is a stable hollow body, not the strongest possible box.
Before decorating, pass three simple checks
Fringe cannot repair a weak body or an inaccessible opening. Stop before decoration and make sure the basic object already works.
- The hollow body holds the intended silhouette without the paper finish.
- The filling flap opens easily and is large enough for the planned contents.
- The hanging area spreads the load and has been tested safely with a representative load.
- The intended front and hanging orientation are marked clearly.
- Decoration can be added without covering the opening or functional parts.
Oliver’s factory view: Beginners often spend most of their time on the fringe and discover too late that the opening is covered or the hanging point pulls out. I always settle the body, opening and hanging area before decoration.
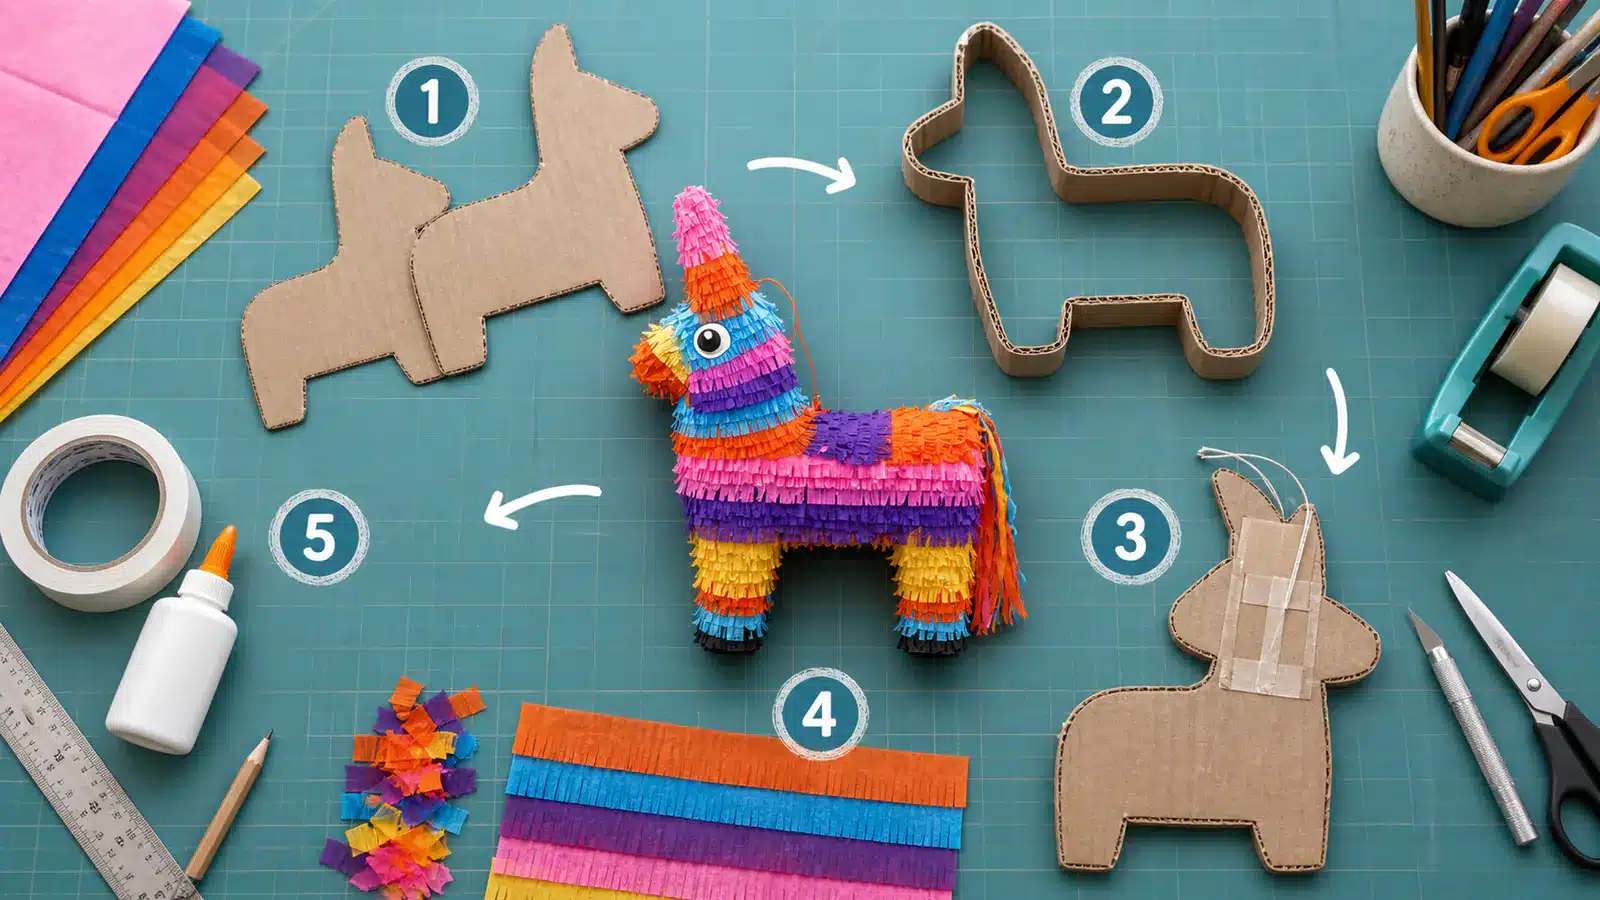
Step 1: draw two matching faces
Draw the main silhouette on one sheet of cardboard, cut it out and trace it for the second face. Keep the first design simple. Very thin arms, narrow necks or sharp internal corners are harder to connect and more likely to bend.
Mark the top, bottom and intended hanging orientation on both pieces. If the design must face one direction, mark the front now so you do not decorate the wrong side later.
Step 2: build the hollow body
Cut a long strip for the side wall. The strip width becomes the body depth, so think about how much filling space you need and how bulky the finished shape should look. Gently score or bend the strip around curves rather than forcing sharp folds everywhere.
Attach the strip around the edge of the first face, then add the second face. Work in short sections and keep checking alignment. Leave a planned flap or opening large enough for the intended contents.
Before closing anything, look inside for loose pieces and make sure the opening will remain accessible after decoration.
Step 3: reinforce the hanging area thoughtfully
The hanging point carries the pinata and its contents. Spread the load over a supported area of the structure instead of piercing one thin surface and expecting the decorative paper to hold it.
Test the empty body first, then test with a small representative load in a safe location. Do not lift the piece by ears, horns or fringe unless they were specifically built as structural parts.
For a display-only object, hanging needs may differ from a party activity. Mark the intended use so another person does not assume the piece was tested for something it was not built to do.
Step 4: cut and layer the paper fringe
Fold or stack paper into manageable strips and cut repeated fringe without cutting completely through the top edge. Prepare colors in batches before gluing so the pattern stays consistent.
Begin near the bottom and work upward so each new row overlaps the attachment edge below. Follow the shape rather than stretching the paper across corners. Use smaller pieces around tight curves and attachments.
- Keep glue away from the filling opening and moving parts.
- Maintain the same general overlap without chasing perfect machine spacing.
- Change colors at planned reference lines.
- Trim the edge carefully after the adhesive has set.
- Add flat facial or graphic details after the main fringe layers.
Step 5: fill, close and check the setup
Let the adhesives dry. Add contents that fit through the opening and are appropriate for the event. Avoid overfilling until the body bulges or the hanging point takes an unplanned load.
Close the filling flap in a way the event organizer can understand, then hang the product in the actual orientation. Check the surrounding activity area, rope or support, supervision and any local requirements before use.
Take a front and side photograph before the event. If you make another version, those images and the dimensions will help you repeat the successful choices instead of starting from memory.
How factory production differs from one DIY piece
A home project can be adjusted continuously while one person works. A factory must turn the approved shape, measurements, colors, opening and hanging point into a reference that many people can repeat. It also has to control labels, quantities, cartons and shipment timing.
That is why a wholesale custom order starts with a sample and documented views. The craft remains handmade, but the decision-making becomes a production system.
Related buyer resources
- Custom Pinatas: Design and Manufacturing Guide
- Custom Pinata Sample: Cost, Timing, Revisions and Approval
- Pinata Quality Control: What Buyers Should Check Before Shipment
Need the design repeated for a wholesale program?
Send the shape, dimensions, quantity, use and packaging needs. We will review how the handmade idea can become an approved production sample.
Frequently asked questions
What are pinatas commonly made from?
They commonly use paper-based structures and decorative paper, with adhesives and other components selected for the design. Exact materials should be confirmed for the product.
Why is handmade production hard to scale?
Many placement, covering and assembly steps depend on manual skill, and the approved appearance must be repeated across many pieces.
Can I send a DIY sample for production review?
Yes. Add dimensions, intended quantity, mechanism, must-keep details, packaging and destination so feasibility can be evaluated.
Is this a factory evidence page?
No. It is an educational guide. The separate factory process page identifies reserved positions for approved real evidence.